Activities and fun with Children of All Ages.

Posts tagged ‘children’

Hop Along

20120904-094712.jpg

Hey all, I’m in Colorado having fun with my grands for a few days. I went hiking with my DD, my DH and grand-dog a few days ago in the Cheyenne Mountains.

Today I’m going to help E finish her paper mâché pig and we’ll have lots of fun on the playground.

What are you doing with your grands this week?

The Money is in the Bank

One of the things Grandparents need to do is teach the grandchildren how to save money.  A good way to do that is give them a piggy bank.  Here is a paper mache tutorial on how to make their own.  Depending on the age of the child(ren) they can make it all themselves or you can help them.  My granddaughter is almost 2 and my grandson is less than six months old.  I’ll be making N’s bank for him.  I’m going to make most of E’s bank and have her put the finishing touches on with Mod Podge and fabric scraps.

Materials

9 inch round balloon

Newspaper for tearing up

Paper egg carton

Masking tape

Flour

Water

Fabric scraps cut up into small pieces

1 pipe cleaner

Mod Podge, glossy

Bowl (for mixing the paste)

Directions:

1.  Make the paper mache paste by mixing the flour and water.  I’m not sure of     the exact measurements but it should be the consistency of thin pancake batter.  Start with equal parts of flour and water.

2.   Blow up the balloon and tear the newspaper into strips.

3.   Dip each strip in the paste and cover the balloon completely. Let dry completely then put 3 more layers on, letting it dry between each layer.

The Body

4.     After the last layer is dry cut the egg carton into sections.  You need 4 legs, a snout and 2 ears.  The legs and  snouts are made out of the cups where the eggs sit.  The ears can be cut from the corners of the top of the carton.


5.  Make more paste, tear more paper, paper mache over and around all the new parts, covering the whole kit and caboodle.  It should be looking like a pig around now.  Let it dry completely then put one last layer on all over making sure to keep the general pig shape.

6.  When the pig is dry, use an exacto knife to cut the money slot in the top and cut an X on the back for a place to put the tail.

7.  Use the pipe cleaner to make the tail.  Wind the pipe cleaner around your finger to curl it.  Poke one end into the X you cut with the knife.

8.  Use the Mod Podge to attach the fabric scraps.  Put some Mod Podge on the pig, place the fabric on top, then cover the fabric with Mod Podge.  Be sure not to cover the slot for the money.  Be sure to secure the tail in well with the Mod Podge and fabric.  Let dry completely.

VOILA!

College, here we come!

What have you created today?

Woo Hoo

Thank you so much Cook Up A Story for the One Lovely Blog Award!

one-lovely-blog-award11

I am honored to be given this by such a wonderful and fun blogger.

I was asked to reveal 7 things about myself.  So, here it goes!

1.  I LOVE growing things. All things: fruits, vegetables, dogs, cats, children, everything.

2.  I am a budding mixed media artist.  My favorite media to work with is gourds.  They look good with all other media.

Image

3.  I was a special education teacher for 15 years specializing in school to work transitions.

4.  I play guitar and sing when the occasion call for it.

5.  I have 5 grand dogs and 2 grand kids

6.  As a person with a disability, I am an advocate for people with disabilities.

7.  I am thrilled and honored to have received this wonderful award.

I’m sorry it took so long to post this.  I have just returned from five weeks of working at St. Joseph’s Youth camp in lovely Morman Lake, Arizona.  What a learning adventure!

I would like to forward this award to some of my favorite blogs:

Natural Living Mama: naturallivingmama.com

Doodles: http://doodlesnyc.com/

Diary of a Mad Crafter: http://diaryofamadcrafter.wordpress.com/

Millibeads: http://millibeads.wordpress.com/

The Hillbilly Housewife: www.hillbillyhousewife.com

Craft Stew: craftstew.com

Have fun and keep crafting!

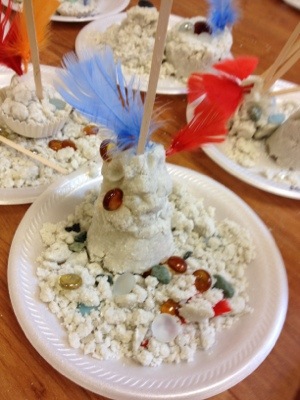
Permanent Sand Castles

Once again Doodles comes through with an amazing activity to do with your grands. I highly recommend you check out her blog and subscribe to it.

Doodles

20120625-140821.jpg

Today at Barrow Street Preschool, we made sandcastles out of sand-clay, which will harden over the next week, retaining their shape. I had two groups ages 3/4 and 2/3, and began the lesson by talking with them about sandcastles they had made in the past at the beach, and also the different parts that one could put on a sandcastle. Then I put them in front of tons of misc materials and let them go wild. The project worked great for both age groups–super tactile and messy. The younger kids did need a lot of extra help with the molds, but one adult per table of 5 seemed to be plenty.

*the sand recipe needs to be cooked before class

(click through for the full lesson plan)

View original post 300 more words

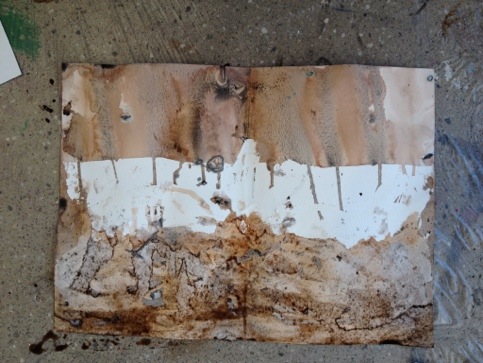
Layered Landscapes no. 4

What a fun activity to do with all ages! This is an activity I will have to try with some little friends.

Doodles

20120726-231235.jpgBy Stella, age 6

In today’s lesson, we used masking fluid and brown and black buckets of ink to create ‘found’ landscapes.

View original post 393 more words

June in Arizona means APPLES

June in the Sonoran Desert  means apple crisp, applesauce, apple leather, dried apples, frozen apples, apple bread, apple muffins, apple cookies….you get the idea.

Image  This is a picture of one of my apple trees.  We got a bumper crop this year from both trees!  With this wonderful crop there are a lot of activities that can be done with the grands involving apples.  This week I will blog about three.  Applesauce, apple leather and apple printing.

Apple sauce is a yummy, healthy, fun, easy food to make.  There are a few things that you will want the younger grands to sit out on.  If they are old enough and can handle a pairing knife they can help with all steps of making apple sauce.

Step 1 – pick and wash the apples.  Don’t worry if they have a little bruise or two.  It adds flavor.  Wash carefully.  If the apples are not organic put them in a sink full of cold water and about 1/4 cup white vinegar for about ten minutes.

Step 2 – cook the apples. If you have a nice colander for making applesauce you don’t need to peel them.  If you are not using a colander peel and core the apples  I like putting them in the crock pot with about 2 cups of water on high.  It only takes a couple of hours.  You can do apple prints or carve apple head dolls while you wait.   If you cook them on the stove it takes about 1/2 an hour.

  Image

Step 3 – When the apples are done cooking they will be soft and slightly yellowish.  They will smell sweet.

Image

Put them in a colander or sieve.  If you have an applesauce colander, just use the wooden pestle to smush the cooked apples to get all the yummy juice and pulp out.

If you do not have an applesauce colander, put the apples in a regular colander over a bowl and use a wooden spoon to squish the applesauce out.  The kids LOVE to do this and watch all the sauce coming out the bottom.

4.  After all the applesauce is out of the peels just compost the peels or give them to the dogs.  You can add sugar and or cinnamon to the applesauce at this point.

One of my fondest memories as a kid is making applesauce and watching as my mom pulled the jars of fresh applesauce from the canning pot.  We took great pride putting them away knowing that we would have yummy applesauce to eat all winter whenever we wanted it.

What are some of your favorite apple memories?  Have you ever made apple head dolls?  Apple prints? Apple butter?

Watercolor Alphabet Cards

This is a great activity for learning the alphabet and developing fine motor skills.

Making Pottery from Clay Soil

How much fun is this? This activity takes patience, time and clay soil.

Growing Our Green Beans

Clay ArtMy four year-old has never met an art project he didn’t like.  Pottery in particular holds a particular mystique for him because of a pottery relic his dad made as a kid, sitting on a bookshelf in our sunroom.  I’ve heard that you can make pottery clay from clay soil, and since we certainly have enough clay soil to go around, decided to give it a try.

After I planted some mountain laurel in a new bed recently, I came out with some extra chunks of clay soil (I always amend the soil with peat moss and top soil when I’m Waterplanting into really rough areas, hence the excess).  Thinking about our possible clay project, I put the chunks into a 5 gallon bucket, covered it with water and let it sit several days.

Several days later I drained some of the water off leaving only a little bit of…

View original post 363 more words

Link

Making the BLOB or Making Fun Healthy Drinks

Mac-n-cheese, cookies, cupcakes, krispie treats, all fun foods. Healthy? NOT.

Make Kombucha, grow your won SCOBY (the blob) and give your grands something wonderful and healthy to boot.

Kombucha is fermented sweet tea. During the fermentation process most of the sugar is consumed and during the second fermentation a nice fizz develops; taking the place of obesity causing soda pop. Komucha provides healthy yeast and bacterium that your body needs to stay healthy and combat everyday exposures to environmental toxins.

To make Komucha you need a SCOBY or Mother. You can order a SCOBY from Cultures for Life or you can make your own with these instructions. If you make your own do this activity with your grands. Bring them back a few weeks later to see the blob they have helped create. Let them help you with the next step, making the kombucha by following the link. Make sure they get to drink some with one of your wonderful, only-at-grandma’s-house meals.

This activity takes time and lots of visits from your grands to complete but it is totally worth it. Continue making the kombucha and giving yourself and your loved ones the nutrients they need.

What kind of healthy and fun foods or drinks do you make with your grands?

Next post we will make all sorts of play dough.

20120519-114513.jpg

Hello world!

Hello! I recently got to spend six weeks with my grandchildren in Denver. What a blast! E is 20 months old and N is 1 month. E is an absolute delight! She wakes up in the morning smiling and ready to take on the day. She loves to paint, color, run, slide, and paste things; especially herself. While I was visiting we made Mommy a mother’s day present, created a painting on canvas, made a travel journal, colored ourselves (more than once), played with play dough; every day was a new adventure.

The purpose of this blog is to help other grandparents and parents come up with fun activities to do with their little ones. They only stay small for a short while. They want to hang out with us for only a few years. Let’s make the most of those years and the rewards will be reaped in spades when they become adults and start doing fun things with their own children.

I will be posting ideas and instructions for fun things to do as well as inviting others to post and join in on the fun. I tend not to endorse any one product, however, some products may be suggested when I know the quality is better for that particular project. There will be blog hops, games, crafts, arts, book reviews and activities to go with them, messy activities and clean activities too.

I love comments, opinions, suggestions and ideas. Bring’em on! Post, re-post and share all you like as long as I get the credit. I will give credit to others too.


20120517-151324.jpg

20120519-095606.jpg

20120519-095649.jpg

20120519-095731.jpg

20120519-095859.jpg

20120519-095947.jpg